

I wanted a low table on which to set up my brewing gear. It would need to support a couple of hundred kilos and fold flat to the garage wall. Failure could send 100 litres of hot liquid and a variety of electrical power equipment crashing to the floor. Neanderthal design principles seemed appropriate to my levels of sophistication and skill, so I hacked together this clunky hinged table top.

Design Goals
I brew in the garage. My gear includes a hot liquor tun, mash lauter tun, and boil kettle all at least 50 litres in capacity, and the HLT and BK powered by electric elements. And I needed a table that could hold all 3 vessels with room spare for valves, tubing, and a few bits of other stuff.
The brew stand was going against a side wall in the garage. I wanted the table to fold away in case of the remote possibility that someone should want to park a vehicle inside the structure. I chose the location because it was conveniently located near the 240 V receptacle that the power controller would require, and below a window that would help vent the steam.
The walls of the garage were supported at intervals with beams of heavy steel channel which seemed ideal for attaching the hinges. The edges of the beams were 84½" apart, allowing a 7' wide table top.
The table top would need to be a minimum of about 15" deep to support my brewing vessels, but closer to 24" would be more convenient. I wanted the table top to be about 24" from the ground. Much lower and there might not be sufficient depth of water to prime the pumps that would be situated below the table; much higher, and it would be difficult to lift the vessels onto the surface and see into them without craning.
The window was about 4' off the ground, so it would have been possible to design a table that folded upwards and was secured at the top edge, with rigid legs that propped into the corner between the floor and the side wall. For an elegant example, see this picture from Jack Olsen's garage:
But to me it seemed stronger and more convenient to have a table that folded downwards and was suspended from heavy chains attached to the beams above.
Table Top
For the table surface, I cut a piece of ¾" plywood 84" long and 22" wide. Then I cut two 84" lengths and four 19" lengths of 2" x 3" framing stud and made a reinforcing perimeter with crosspieces fastened with 3" deck screws. This was secured to the plywood top with 1‑5/8" deck screws, making it very rigid and heavy. After caulking the gaps I primed and painted with oil-based porch floor paint. I didn't take a picture of it because it's just a big grey rectangular thing, and anyway I nicked the design from the Natural Handyman.
Hinges
My plan for the hinges basically involved bunging together the thickest bits of metal I could lay my hands on and hoping for the best. A ¾" bolt, fastened through the near side of the beam, would act as the pin. A piece of ¾" pipe would form the barrel of the hinge, with flat bar welded to the sides of the pipe to make a bracket that would attach to the underside of the table top.
I started by sawing the 5" nipple in half. Then I cut the flat bar into 2x 1½" and 2x 3½" lengths. After cleaning everything up with a flap disk and wire brush, I tack welded a 3½" section on one side of each nipple, and a 1½" length on the other side. Here is a picture of the initial tacks. Perhaps not the highest quality welds the world has ever seen. I used 1/8" E6013 electrodes at 125 A.

I didn't have too much trouble welding a bead between the tacks on the reverse side, but I found it very taxing to weld inside the narrow gap between the pipe and the flat bar. After grinding out loads of porous crap, I eventually managed something satisfactory by turning the amps up slightly, jamming the rod as far as I could into the gap, and dragging it all the way across at a 45° angle. I could have just drilled 3/8" holes for attaching the hinges to the table top and left it at that, but I decided to dress up the threaded end of the pipe by welding on half a washer. Not only was this probably unnecessary, but the resulting welds were disastrous and I couldn't reach into the corners to grind them out. Here are the resulting monstrosities. I had to make the long sides thinner after drilling the holes in the beams and finding that there was not enough room for the hinges to move freely.

I washed them in soapy water, then acetone, and painted them using a high tech spraying jig. Finally, I drilled holes through the table top to accommodate the 3/8" bolts that attach the hinges.

Wedgie Washers
The outside wall of the beam was perpendicular to the wall, but inside the channel wall sloped. To fasten each bolt I would need a wedge-shaped washer. Using an angle grinder with a cut-off wheel, I cut thin segments off each of 2 washers. After stuffing the cut-off segments between the round edges, I welded the washers together on both sides. My rookie welds were not very straight.


Here is the wedgie washer in situ between the nut and inner beam wall, holding up one end of the table top. The bolt that I used was far longer than it needed to be.

And here are two views of the hinge: from the top, looking down the back of the table, and from the front with the table top down. (The oil mark on the wall is from spraying cutting oil all over the place trying to drill a ¾" hole in the beam. My step drill could only make it about halfway through and I ended up having to remove a lot of material using a hand file, which was extremely hard work.)


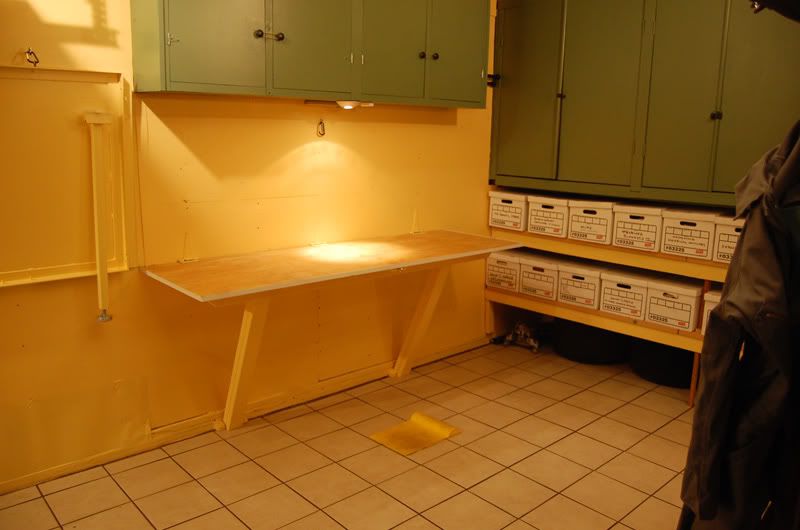
Finished Table
On the left folded down; on the right, supported by kegs which with a block of 2" x 4" lumber on top turn out to be exactly the right height to prop up the table top. Eventually I will make good on my plan to suspend the table top from chains attached to tie-downs bolted and/or welded higher up the beams.

The tabletop is flat, yeah! It slopes very slightly from back to front so spilled liquid should drain forwards.

Safety
I found this project rather Tricky. Welding is a skill that can really only be acquired through good teaching and long practice. It is can also be Dangerous and the appropriate safety procedures must be observed. Protect your eyes with a welding helmet and wear thick leather gloves and long-sleeved cotton clothing. Ensure that the area is adequately ventilated, and try to avoid electrocution. Always use the safety guard on the angle grinder and wear goggles and ear protection. Remove flammable materials from the vicinity when welding and grinding and keep a fire extinguisher handy.
Materials
Table top
- ¾" plywood sheet
- 3x 2" x 3"x 96" framing stud
- 3" deck screws
- 1-5/8" deck screws
- Paintable exterior caulk
- Exterior latex primer
- Exterior oil-based gloss porch & floor paint
Hinges
- 10" x 1½" x 3/16" thick piece of flat bar (scrap)
- ¾" black pipe, 5" nipple
- 6x ¾" galvanized washers
- 2x ¾" galvanized hex head bolt
- 4x ¾" galvanized hex nut
- Rustoleum hammered metal finish spray paint, black
- 1/8" E6013 electrodes
To attach hinges to table top
- 4x 3/8" x 4" galvanized hex head bolt
- 4x 3/8" galvanized hex nut
- 8x 3/8" galvanized washers
Dumb and Easy Supports
- 2x Sanke kegs
- 2x offcuts of 2" x 4" stud to shim between table top and kegs
or
Suspended Supports
- 2x 4' length of ¼" Grade 30 Proof chain
- 2x ½" eye bolts
- 2x ½" penny washers
- 4x ¼" quick link
- 2x tie down anchor
No comments:
Post a Comment